Terrace Vegetable Garden Layout Ideas for Beginners — Plan Your Perfect Growing Space

You have a terrace. You have a dream of growing your own vegetables. But where do you begin? What goes where? How do you make the most of your space without it looking cluttered or feeling overwhelming?
This guide is your complete beginner’s roadmap to planning and laying out a productive terrace vegetable garden — one that is organised, beautiful, and built to grow. We cover everything from understanding your terrace to choosing the right layout style and arranging your beds, containers, and pathways for maximum efficiency.
Note: This article focuses on layout and planning. For detailed guidance on soil preparation, watering systems, and seasonal growing, watch out for our upcoming articles in this series.
Why Layout Planning Is the Most Important First Step
Most beginner terrace gardeners make the same mistake — they buy plants and pots excitedly and place them wherever there’s space. The result? A chaotic arrangement where some plants get no sun, pathways are blocked, watering becomes a struggle, and the garden feels like a chore rather than a joy.
A well-thought-out layout solves all of this before you spend a single rupee on plants. It ensures:
- Every plant gets the right amount of sunlight
- You can move around comfortably to water, prune, and harvest
- The space looks intentional and beautiful
- You can expand in phases without starting over
- Maintenance becomes a pleasure, not a burden
Step 1 — Know Your Terrace Before You Plan
Before sketching any layout, spend a few days observing your terrace. This is the single most valuable thing a beginner can do.
Measure Everything
Grab a measuring tape and note down:
- Total terrace area (length × width)
- Location of walls, parapet, water outlet/drain
- Position of any overhead water tank, shade structure, or staircase entrance
- Distance from the nearest water tap
Sketch a rough top-view map on paper. Even a simple hand-drawn diagram works perfectly.
Track the Sun
Observe sunlight movement across your terrace over one full day:
| Time | Which Area Gets Sun |
|---|---|
| 7 AM – 10 AM | Note the morning sun zone |
| 11 AM – 2 PM | Note the peak sun zone |
| 3 PM – 6 PM | Note the afternoon sun zone |
| All day | Identify any permanently shaded spots |
This sunlight map becomes the foundation of your layout. Full-sun vegetables need 6+ hours of direct sun. Place them in your sunniest zones.
Check Load-Bearing Capacity
This is critical and often overlooked. Wet soil and large containers are very heavy.
- Edges and corners of a terrace are structurally stronger than the centre.
- Place heavy raised beds and large containers along walls and parapets.
- Use lightweight growing media (coco peat + perlite mix) to reduce weight.
- If in doubt, consult a structural engineer or your building contractor.
Wind and Shade Mapping
- Note which direction strong winds come from.
- Identify shadows cast by walls, overhead tanks, or neighbouring buildings.
- Plan tall plant trellises on the windward side — they’ll act as natural windbreaks.
Step 2 — Choose Your Layout Style
Your layout style sets the character of your entire garden. Here are the most practical and popular options for terrace vegetable gardens:
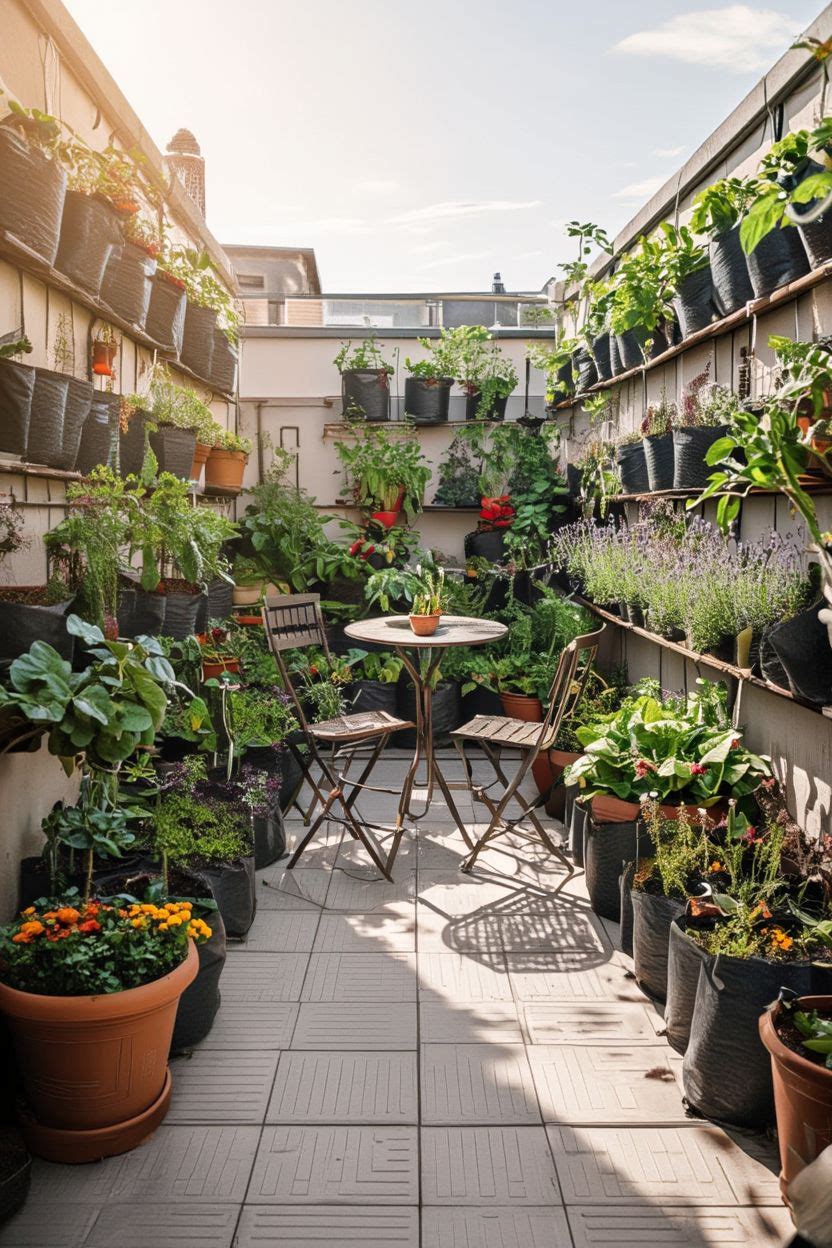
Layout 1 — The Border Layout (Best for Beginners)
Place all containers and grow bags along the four edges/walls of the terrace, leaving the central area open as a walkway or seating zone.
Why it works:
- Extremely simple to implement
- Plants along walls get wind protection
- Central open space gives the terrace a spacious, airy feel
- Easy access to all plants from the central walkway
Ideal for: Small to medium terraces (up to 300 sq ft), beginners, rentals
[ WALL ]
[POT][POT][POT][POT][POT][POT]
[POT]                     [POT]
[POT]   OPEN SPACE /      [POT]
[POT]   SEATING AREA      [POT]
[POT]                     [POT]
[POT][POT][POT][POT][POT][POT]
[ PARAPET / RAILING ]
Layout 2 — The Row Layout (Most Productive)
Arrange grow bags and containers in neat parallel rows running east to west, with clear pathways between each row.
Why it works:
- Maximum planting density
- East-west rows ensure all plants receive even sunlight throughout the day
- Pathways allow comfortable access for watering and harvesting
- Easy to scale up by adding more rows
Pathway width: Minimum 60 cm (2 feet) between rows for comfortable movement.
Ideal for: Medium to large terraces (300–800 sq ft), those focused on maximum vegetable yield
[ROW 1 — Tall plants: Tomato, Brinjal, Chilli]
         — pathway 60cm —
[ROW 2 — Medium plants: Capsicum, Beans]
         — pathway 60cm —
[ROW 3 — Low plants: Spinach, Coriander, Radish]
         — pathway 60cm —
[ROW 4 — Herbs: Basil, Mint, Curry Leaf]
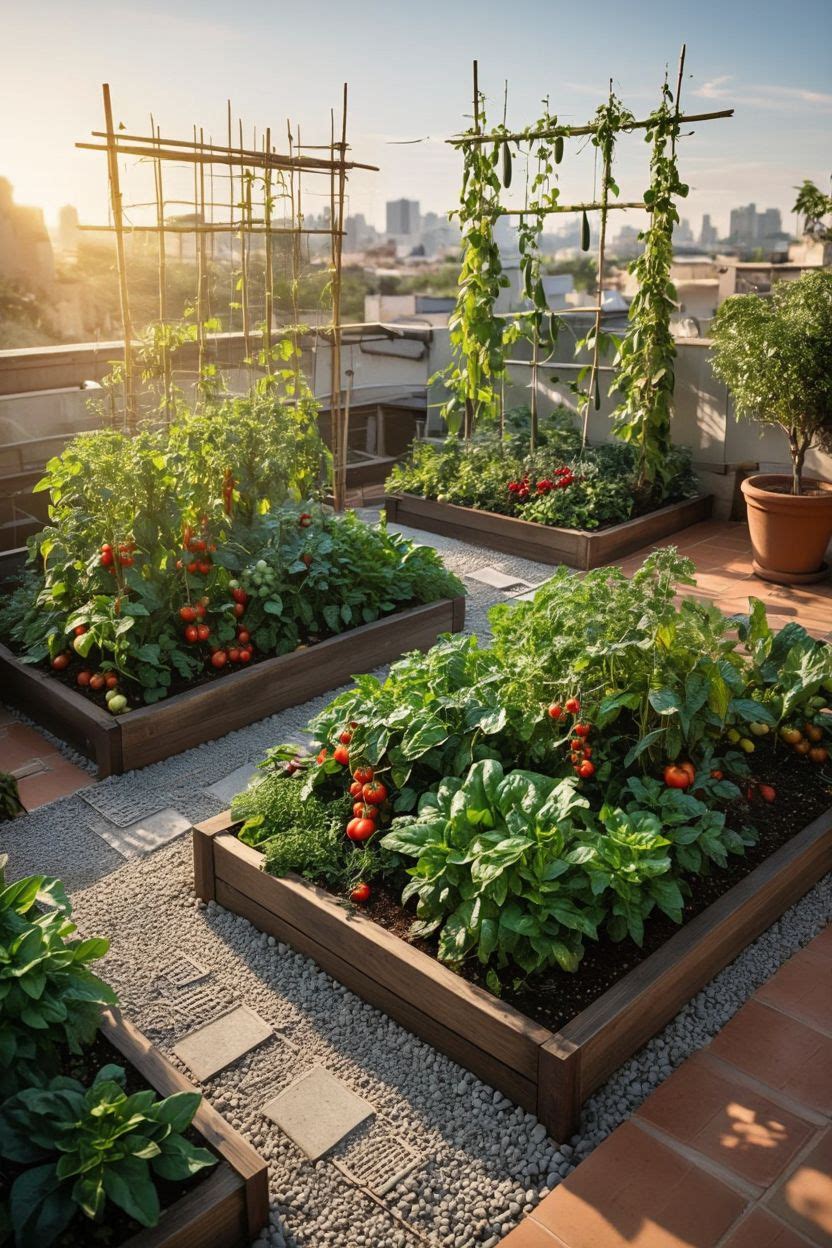
Layout 3 — The Raised Bed Layout (Most Beautiful)
Build or place rectangular raised beds in a structured pattern, with defined pathways between them. This is the most visually striking and organised layout.
Standard raised bed sizes:
- Width: Max 90–120 cm (so you can reach the centre from either side)
- Length: 120–240 cm depending on space
- Height: 30–45 cm (deep enough for most vegetables)
Why it works:
- Looks incredibly neat and professional
- Defined beds prevent soil compaction on pathways
- Easier to manage soil quality per bed
- Great for intensive planting
Ideal for: Large terraces (600 sq ft+), permanent homes, those wanting a show-garden aesthetic
Layout 4 — The Mixed Container Layout (Most Flexible)
A combination of grow bags, pots, crates, and raised beds arranged in a relaxed, organic style. Not strictly geometric — more like a cottage garden feel.
Why it works:
- Most flexible — easy to rearrange and experiment
- Can be built up gradually without a fixed plan
- Great for those who want variety and a lush, layered look
- Suits terraces with irregular shapes or existing structures
Ideal for: Irregular terraces, renters, those who love a boho/jungle aesthetic
Layout 5 — The L-Shape or U-Shape Layout
Place beds and containers in an L-shape or U-shape along two or three walls, leaving one or two sides open. A central feature like a seating corner or a large specimen plant (lemon tree, curry leaf) anchors the design.
Why it works:
- Creates a natural garden “room” feel
- The open side keeps the terrace from feeling closed in
- Central feature adds visual interest
Ideal for: Corner terraces, terraces attached to a living room or bedroom
Step 3 — Zoning Your Terrace Garden
Think of your terrace as a series of zones, each with a specific purpose. Good zoning makes your garden both beautiful and highly functional.
Zone 1 — The Sun Zone (Primary Vegetable Zone)
Your sunniest area. Reserve this for:
- Tomatoes
- Chillies and capsicum
- Brinjal
- Beans and peas
- Cucumber and bottle gourd (with trellis)
- Okra (bhindi)
Zone 2 — The Partial Sun Zone
Areas that receive 3–5 hours of sun. Great for:
- Leafy greens (spinach, methi, palak)
- Coriander
- Lettuce
- Spring onions
- Radish
Zone 3 — The Herb Corner
A dedicated, easily accessible corner near the entrance or kitchen-side of the terrace. Keep frequently used herbs here:
- Basil
- Mint
- Curry leaf
- Lemongrass
- Ajwain (carom)
Zone 4 — The Trellis / Vertical Zone
The sunniest wall or parapet. Use this for climbing and vining plants:
- Tomatoes (indeterminate varieties)
- Beans
- Cucumber
- Bitter gourd
- Passion fruit
Zone 5 — The Compost & Tool Corner
Tuck this in the least visible, least sunny corner:
- Compost bin or vermicompost box
- Watering cans, tools, extra pots
- Potting mix storage
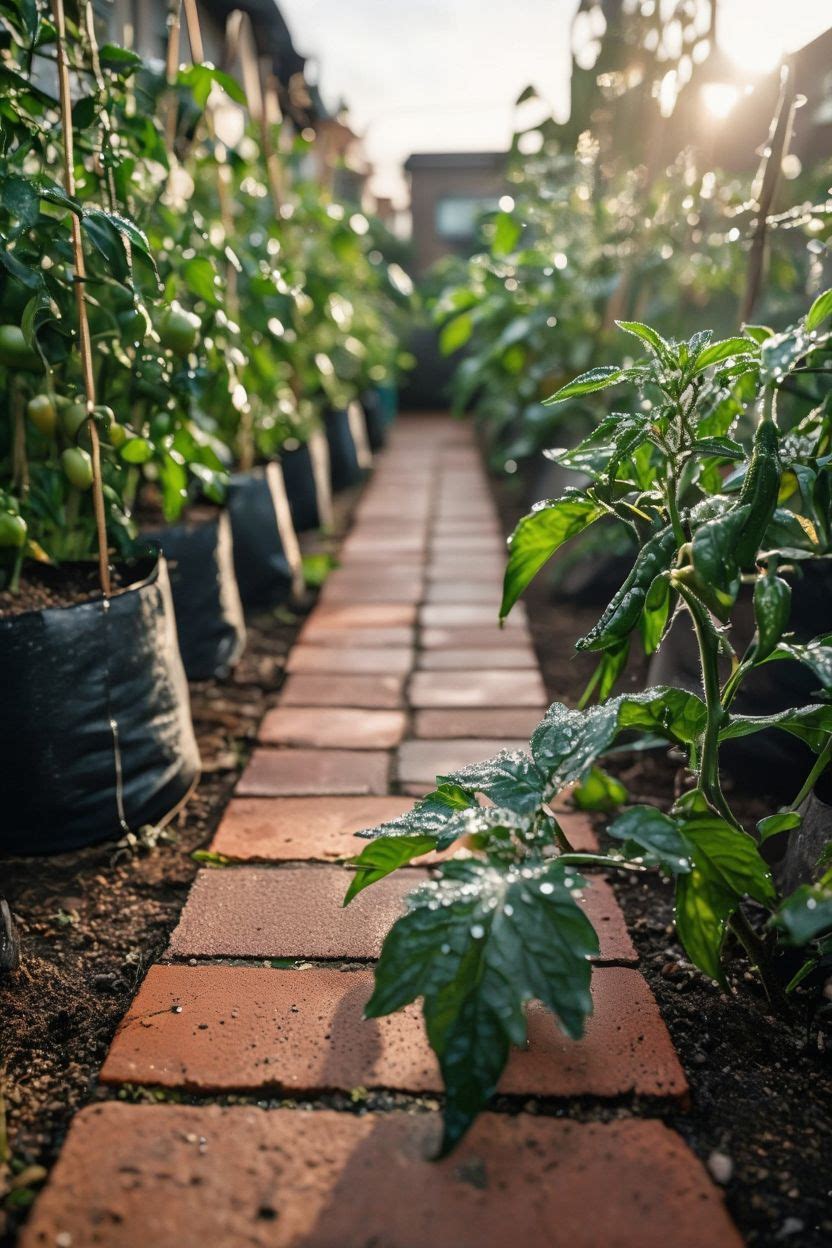
Step 4 — Planning Pathways
Pathways are as important as the planting areas. Never skip them.
Pathway rules:
- Minimum 60 cm wide for comfortable single-person access
- Use anti-slip outdoor tiles, bricks, gravel, or outdoor rubber mats — wet soil splashes make surfaces slippery
- Keep pathways clear at all times — no trailing plants, no obstacles
- Consider a central wider pathway (90 cm) if you’ll be using a watering can frequently
Step 5 — Vertical Structures in Your Layout
Every terrace garden should have at least one vertical element. It draws the eye upward, maximises space, and can double as a privacy screen.
Types of Vertical Structures
Trellis panels — Fix to walls or stand freestanding. Train tomatoes, beans, and cucumbers up them.
A-frame trellis — Two panels leaning against each other in an A shape. Grow cucumbers on both sides.
Bamboo teepee — Bundle bamboo poles and tie at the top. Perfect for pole beans.
Shelving units — Metal or wood shelves holding tiered rows of smaller pots.
Arch trellis — Create a dramatic garden entrance. Grow passion fruit or roses over it.
Placement Rules for Vertical Structures
- Always place tall structures on the north or west side so they don’t cast shade on shorter plants.
- Secure structures firmly — they catch wind and can topple.
- Leave at least 30 cm between a trellis and the wall behind it for air circulation.
Step 6 — Sample Layout Plans
Plan A — Small Terrace (10 × 10 ft / ~9 sq m)
[NORTH WALL]
[Trellis — Tomato & Beans]
[Grow bag][Grow bag][Grow bag]  ← Chilli, Brinjal, Capsicum
        — pathway —
[Herb pots along south parapet — Basil, Mint, Coriander, Curry Leaf]
[SOUTH / ENTRANCE]
Total containers: 10–12 grow bags + 6–8 herb pots
Plan B — Medium Terrace (20 × 15 ft / ~28 sq m)
[NORTH WALL — Trellis with Cucumber & Beans]
[Row 1 — Large grow bags: Tomato × 4, Brinjal × 2]
              — pathway 60cm —
[Row 2 — Medium grow bags: Chilli × 4, Capsicum × 2, Okra × 2]
              — pathway 60cm —
[Row 3 — Small pots: Spinach, Methi, Coriander, Radish]
[EAST WALL — Herb shelf: Basil, Mint, Lemongrass, Curry Leaf]
[CORNER — Compost bin + Tools]
[SOUTH — Seating: 2 chairs + small table]
Total containers: 25–35 grow bags + pots
Plan C — Large Terrace (30 × 20 ft / ~55 sq m)
[NORTH — Long raised bed: Tomato, Brinjal, Chilli (with trellis backing)]
[WEST — Raised bed: Leafy greens, Radish, Spring onion]
[CENTRE — 2 raised beds (120×240cm): Mixed vegetables]
[EAST — Herb garden bed + Curry Leaf tree in large pot]
[SOUTH-EAST — Compost + Tool zone]
[SOUTH-CENTRE — Seating area with bistro table, fairy lights]
[SOUTH-WEST — Ornamental flowering pots for aesthetics]
Total growing area: 6–8 raised beds + feature pots
Step 7 — Choosing the Right Containers for Your Layout
The containers you choose affect both the look and the productivity of your layout.
| Vegetable | Recommended Container | Minimum Depth |
|---|---|---|
| Tomato | 15–20 litre grow bag | 40 cm |
| Chilli / Capsicum | 10–15 litre grow bag | 30 cm |
| Brinjal | 15–20 litre grow bag | 40 cm |
| Spinach / Methi | Wide shallow tray or 5L pot | 15 cm |
| Coriander | 5–8 litre pot or tray | 15 cm |
| Radish | Deep pot or grow bag | 30 cm |
| Beans | 10 litre grow bag with trellis | 25 cm |
| Cucumber | 20 litre grow bag with trellis | 40 cm |
| Curry Leaf | 20–30 litre pot | 40 cm |
| Lemon / Dwarf fruit | 30–50 litre pot | 50 cm |
Step 8 — Aesthetic Touches for a Beautiful Layout
A productive terrace garden can also be a beautiful one. A few simple design touches make all the difference:
- Consistent container colours — Choosing the same colour family (all black grow bags, all terracotta) gives a cohesive, intentional look.
- Varying heights — Use pot stands, shelves, and hanging planters to create a layered, multi-level visual.
- A focal point — One statement plant (a large curry leaf tree, a bougainvillea, a lemon tree) anchors the whole garden visually.
- Name markers — Handwritten or printed plant labels add a charming, organised touch.
- Edges and borders — Line pathways with small stones, bricks, or border tiles to define spaces cleanly.
- Colour blocking — Group flowering plants or colourful vegetables (red chillies, yellow capsicum, purple brinjal) together for visual impact.
Your Terrace Garden Layout Checklist
Before you place a single pot, tick off this checklist:
- Terrace measured and sketched on paper
- Sunlight zones identified (full sun / partial sun / shade)
- Load-bearing areas noted (edges and corners preferred)
- Wind direction mapped
- Layout style chosen (border / rows / raised beds / mixed)
- Zones defined (vegetables / herbs / vertical / compost)
- Pathways planned (min 60 cm wide)
- Vertical structures planned and positioned
- Container sizes matched to vegetables
- Aesthetic elements considered
What’s Next in This Series?
This article covers layout and planning — the foundation of your terrace garden. Coming up next in our Terrace Vegetable Garden series:
- 🌱 Soil & Growing Media — The perfect mix for terrace containers
- 💧 Watering Systems — From hand watering to drip irrigation
- ☀️ Season-by-Season Growing Guide — What to plant and when
- 🐛 Pest & Disease Management — Keeping your crops healthy naturally
Stay tuned and subscribe to our newsletter so you never miss an update!
Final Thoughts
A great terrace vegetable garden doesn’t happen by accident — it starts with a great layout. Take the time to observe your space, plan on paper, and think through your zones and pathways before you begin. The hours you invest in planning will save you weeks of frustration later.
Your terrace has more potential than you realise. Now it’s time to unlock it — one container, one row, one harvest at a time.
Happy planning and happy growing! 🌿
Which layout style are you planning to use? Share your terrace garden photos and plans in the comments — we’d love to feature your space!