14 Beautiful Trellis Ideas for the Front of Your House (Step-by-Step Guide)
Introduction
You don’t need a full landscaping crew or a big budget to make your front yard look like it belongs on a magazine cover. A trellis — that simple frame of wood, metal, or bamboo — can completely change the way your home looks from the street.
The best part? It works on almost any house style. Traditional cottage, modern farmhouse, Mediterranean stucco, classic colonial — there’s a trellis style that fits each one. And when climbing plants like roses, clematis, or wisteria take hold, the results are genuinely jaw-dropping.
This guide walks you through 14 real, practical trellis ideas for the front of your house, matched to the reference styles you see on Pinterest right now. For each one, you’ll get the exact steps, material recommendations, approximate costs, and where to buy in the USA.
Before You Start — Quick Trellis Planning Checklist
Before picking a style, answer these four questions:
- Where will the trellis go? (Front door, side wall, fence, window frame, along a walkway)
- What’s your house style? (Cottage, modern, farmhouse, colonial, Mediterranean)
- How much do you want to spend? (Under $100 / $100–$400 / $400+)
- What plants will you grow? (Roses need strong support; clematis is lighter; ivy covers fast)
Use this quick reference table before shopping:
| House Style | Best Trellis Type | Best Climbing Plant | Approx. Cost |
|---|---|---|---|
| Cottage / Farmhouse | White wood lattice arch | Climbing roses | $80–$250 |
| Modern / Contemporary | Black steel grid panel | Virginia creeper or ivy | $150–$500 |
| Craftsman / Bungalow | Cedar wood pergola frame | Roses or climbing hydrangea | $200–$600 |
| Colonial / Traditional | White vinyl lattice panels | White roses or wisteria | $100–$350 |
| Mediterranean / Stucco | Painted wood or bamboo grid | Bougainvillea or jasmine | $50–$200 |
| Rustic / Country | Reclaimed wood horizontal bars | Wildflowers and loose vines | $20–$80 |
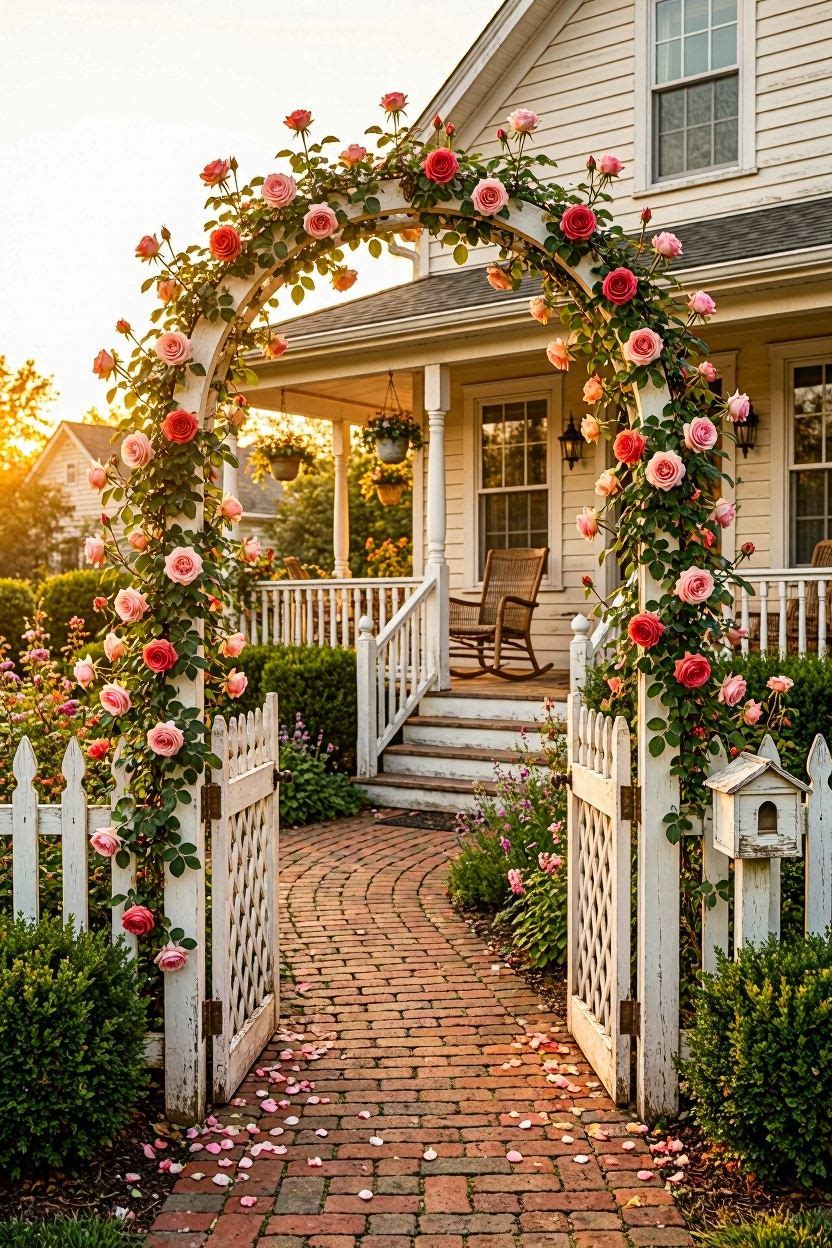
1. White Lattice Rose Arch at the Front Gate
This is the most classic trellis look in American neighborhoods — and it delivers every single time. A white-painted wood arch with diamond lattice panels on each side sits right at the garden gate. Climbing roses are trained up both sides until they meet at the top and spill over.
What makes it work: The white paint matches most house trim. The arch gives height and acts as a visual “welcome” moment. Roses like ‘New Dawn’ (pink) or ‘Don Juan’ (red) bloom from May through September in most US zones.
Step-by-step:
- Buy a pre-made white wood garden arch. Home Depot’s “Garden Treasures” or the EROMMY arch on Amazon run $80–$140.
- Dig post holes 18 inches deep using a manual auger or clamshell digger. Pour Quikrete fast-set concrete ($6/bag, 2 bags needed) and let cure 24 hours.
- Attach two 8 ft × 4 ft white vinyl lattice panels on either side of the arch for the full cottage look. Lowe’s carries these for $20–$35 per panel.
- Plant one climbing rose on each side, 6 inches from the base of each post.
- As canes grow, weave them through the lattice and secure loosely with soft garden ties (not wire — it cuts stems).
- Paint the arch annually with exterior latex paint in white or cream to keep it looking fresh.
Cost breakdown:
| Item | Where to Buy | Price |
|---|---|---|
| Pre-made wood arch | Home Depot / Amazon | $80–$140 |
| Quikrete fast-set concrete (2 bags) | Home Depot | $12 |
| Vinyl lattice panels × 2 | Lowe’s | $40–$70 |
| Climbing rose plants × 2 | Plant Delights Nursery / local garden center | $30–$60 |
| Garden ties + pruning shears | Amazon | $15 |
| Total | $177–$297 |
2. Black Steel Grid Trellis for Modern Homes

If your home has a clean, modern look — white or grey stucco, large windows, flat or low-pitched roof — a warm wood arch will look completely out of place. What you need is a black steel grid trellis.
This is a metal framework mounted directly to the exterior wall. Vines grow through the grid, and over time the wall becomes a vertical living surface. The dark iron color makes the green pop dramatically against white walls.
Step-by-step:
- Measure the wall section you want to cover. Standard panels are 4 ft × 8 ft. For a full wall section, plan on 3–6 panels.
- Buy powder-coated steel wall trellis panels. ACHLA Designs sells them on Amazon for $45–$90 per panel. For a heavier, more architectural look, a local metal fabricator can cut square steel tubing frames for $150–$300.
- Mount panels with 2-inch standoff wall anchors so the vine has room to grow between the panel and wall. This also prevents moisture damage to the siding. Use concrete anchors if mounting into stucco.
- Plant Virginia creeper (Parthenocissus quinquefolia) or Boston ivy at the base. Both grow fast and cling to surfaces on their own. Available at Home Depot for $15–$25 per plant.
- For a slower, neater look, plant climbing hydrangea (Hydrangea anomala petiolaris) — it takes longer to fill in but has spectacular white blooms.
Note: For the look in the reference image, the trellis runs from ground level to the roofline. This takes 2–3 growing seasons to fill in fully.
| Material | Cost | Notes |
|---|---|---|
| Steel wall trellis panels × 4 | $180–$360 | ACHLA Designs on Amazon |
| Standoff wall anchors | $20–$40 | Use stainless steel to avoid rust staining |
| Virginia creeper or ivy × 3 | $45–$75 | Home Depot / Lowe’s |
| Total | $245–$475 |
3. Rustic Wood Arch with Wisteria Over the Front Door
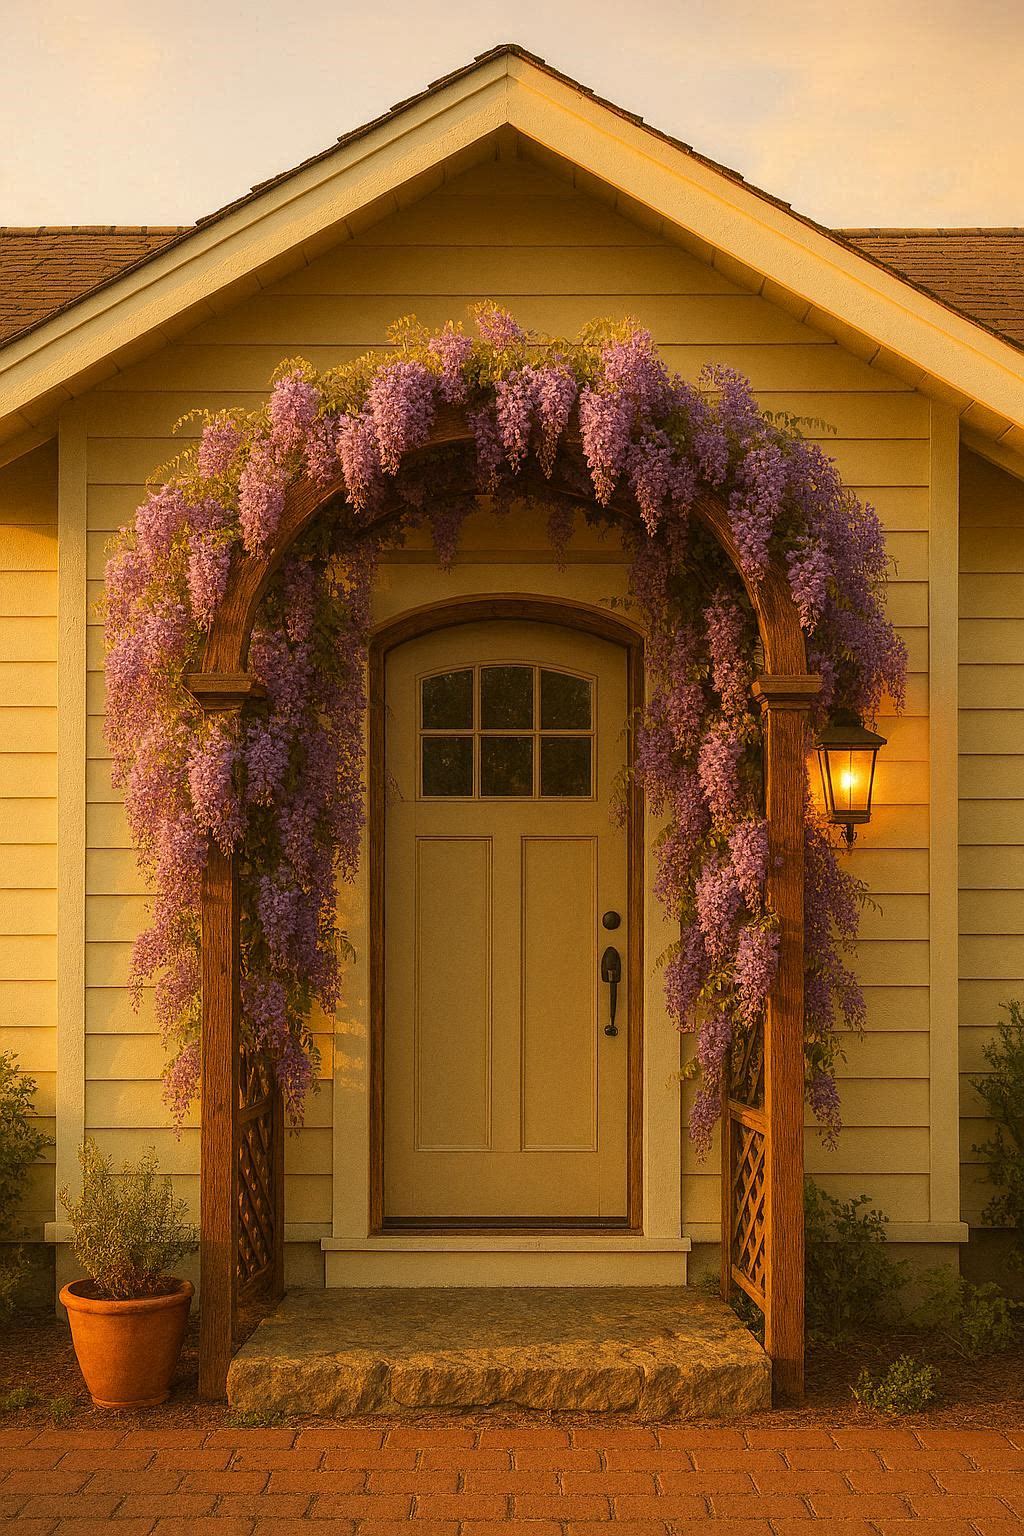
This is the most dramatic single-plant trellis idea on this list. Wisteria drips down in long purple clusters that smell incredible in spring. When it’s fully grown over a wooden arch above a front door, it looks like something from a French countryside village.
The key here is a strong arched trellis built directly above the door frame — not a free-standing garden arch. It’s anchored to the house structure itself.
Step-by-step:
- Build or commission a door-frame arch trellis. Cedar is the best wood — it’s rot-resistant and lasts 10–20 years without treatment. A local carpenter can build this custom for $300–$800. Alternatively, the Zippity Outdoor Products WF29005 arbor at Walmart runs about $200.
- Bolt the upright posts to the house exterior on both sides of the door using 4-inch lag screws driven into wall studs. This matters — mature wisteria can weigh 50+ pounds.
- Attach a small lattice grid section to each side post to give the vine something to grip as it climbs.
- Plant Wisteria frutescens ‘Amethyst Falls’ — the American variety, not the invasive Japanese species. Available at most nurseries for $25–$40, or online at Nature Hills Nursery.
- Train early shoots upward with soft ties. Pinch side shoots back to 5–6 leaves to keep it tidy in the first few years.
- Patience required: Wisteria takes 3–5 years to bloom heavily. Feed with a low-nitrogen fertilizer (like a tomato fertilizer, 5-10-10) each spring.
Best wisteria varieties for USA:
| Variety | Color | Zones | Notes |
|---|---|---|---|
| Wisteria frutescens ‘Amethyst Falls’ | Soft purple | 5–9 | Native, non-invasive |
| Wisteria macrostachya ‘Blue Moon’ | Blue-purple | 3–9 | Very cold hardy |
| Wisteria sinensis | Deep purple | 5–9 | Fast-growing, strongly fragrant |
4. Wood Arch Trellis with Clematis at the Entry
A simple arched wooden trellis — two upright posts and a curved top — with clematis growing up one side is one of the quickest wins in front-yard design. Clematis blooms in its second year, flowers in colors from deep purple to white and pink, and doesn’t get as heavy or aggressive as wisteria or roses.
Step-by-step:
- Choose your arch. A basic cedar arbor (Gardman brand, around $60–$120 at Lowe’s) works perfectly.
- Set posts 12–18 inches into the ground with concrete.
- Attach a diamond lattice panel to at least one side of the arch. Clematis climbs by wrapping leaf tendrils around thin supports — wire, lattice, or twine all work well.
- Plant Clematis ‘Jackmanii’ (classic deep purple) or Clematis ‘Nelly Moser’ (pale pink with a darker stripe) at the base. Home Depot carries these for $15–$30.
- In late winter, cut all stems back hard (this is Group 3 pruning) to keep the plant vigorous and flowering on fresh wood each year.
Why clematis beats wisteria for beginners: It’s smaller, less aggressive, blooms in year 2, and comes in dozens of colors and sizes. If this is your first trellis project, start here.
5. Bamboo Grid Trellis on a Stucco or Plaster Wall
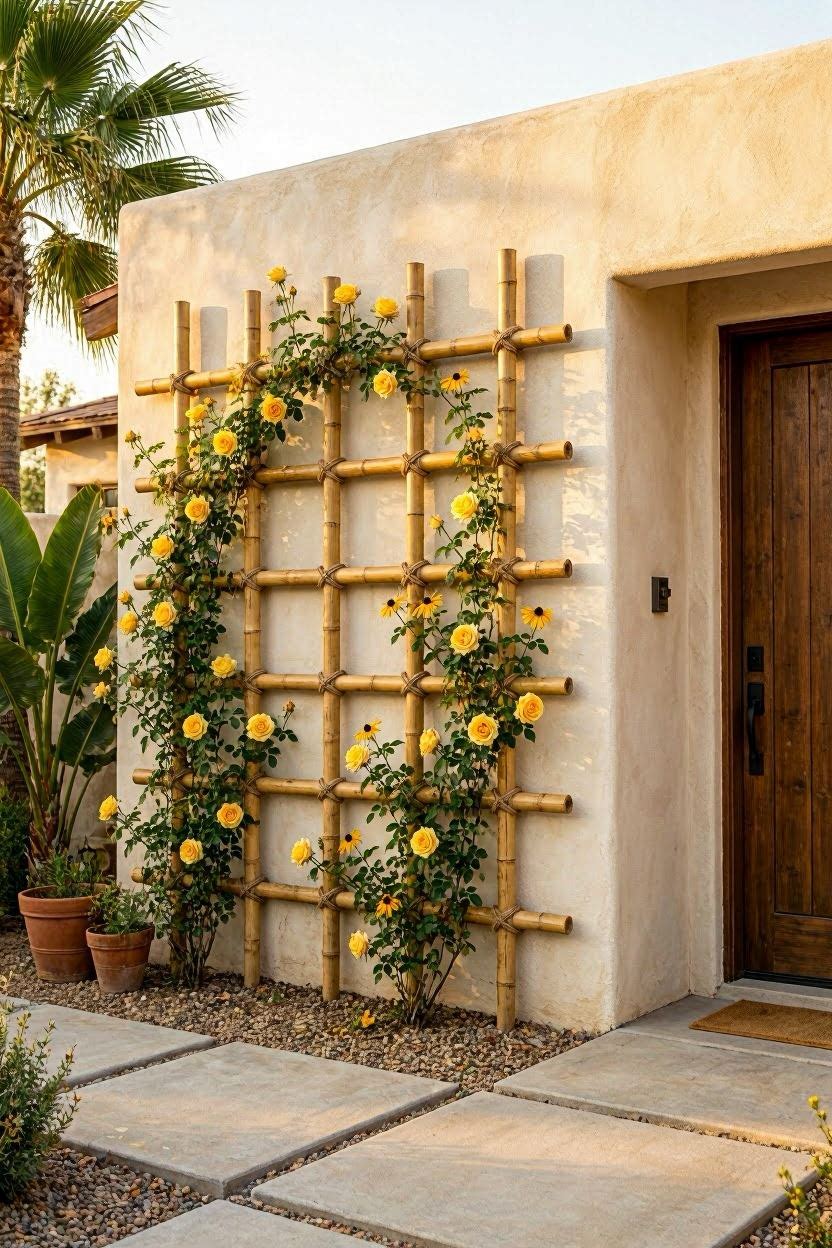
Bamboo trellises give a warm, natural, slightly tropical feel that works beautifully on stucco or smooth plaster homes — California ranch, Florida bungalow, or Southwest adobe style.
The grid pattern (horizontal and vertical poles tied at intersections with jute twine) is simple enough to build yourself for under $50.
Step-by-step:
- Buy natural bamboo poles from Amazon or a local garden center. For a 4 ft × 6 ft grid, you’ll need about 8–10 poles at 1-inch diameter. A bundle of 25 runs $20–$35.
- Lay out your grid on a flat surface before mounting. Space poles 8–12 inches apart in both directions.
- Tie each intersection with natural jute twine using a square lashing knot. (Search “square lashing trellis” on YouTube for a 2-minute visual tutorial.)
- Mount the finished grid to the wall using small L-brackets or eye hooks screwed into mortar joints, not directly into the stucco face. Leave 2 inches of air gap between the grid and wall.
- Plant a climbing rose, black-eyed Susan vine (Thunbergia alata), or golden trumpet vine (Allamanda cathartica) in warm zones for the yellow flower effect in the reference image.
Cost: Under $60 total. This is the most budget-friendly trellis idea on this list.
6. Pergola Walkway with Trellis Side Panels
If you have a longer front path — say 10 to 30 feet from the street to your door — a pergola walkway with trellis side panels creates one of the most dramatic curb-appeal upgrades possible. You literally walk through a canopy of flowers to reach the front door.
This is a bigger project, but you don’t have to build it all at once. Start with two arch sections and add more over time.
Step-by-step:
- Plan your layout. Measure the full length of your front path. Typical pergola arches are spaced 4–6 feet apart. A 20-foot walkway uses 4–5 arch sections.
- Buy a pergola arch kit. Vita Leisure and YARDLINK both sell modular pergola kits at Home Depot for $250–$600 per section. Or build from scratch using pressure-treated 4×4 posts and 2×6 crossbeams for lower cost.
- Set posts in concrete. Each post goes at least 2 feet into the ground. Use a level to ensure posts are perfectly plumb before the concrete sets.
- Add trellis side panels. Attach 4 ft × 4 ft lattice panels to the inside face of each pair of upright posts so climbers have a vertical surface to cover.
- Plant roses on both sides. Plant one climber at the base of each post. ‘New Dawn’ (pink) or ‘Cécile Brünner’ (small clustered pink blooms) are classics for pergola walkways.
- Tie in new growth regularly. In the first two years, guide canes horizontally along the top beams to encourage the canopy effect.
Budget: $800–$3,000+ depending on length and whether you use kits or build from scratch with lumber.
7. Painted Trellis to Match Your Front Door Color

Most people build trellises in white or natural wood brown. But painting your trellis the same color as your front door — or a bold complementary accent — turns it into a true design statement. The reference image shows this brilliantly: a turquoise pergola frame that matches the door exactly against crisp white walls.
Step-by-step:
- Build or buy any basic wood trellis arch or pergola entry frame.
- Before mounting, sand the wood lightly and apply one coat of exterior wood primer (Zinsser Bulls Eye, about $20 at Home Depot).
- Choose your color. Matching the front door exactly is the simplest approach. Popular choices:
- Navy blue on white or grey houses
- Sage green on cream or tan houses
- Terracotta on white or yellow stucco
- Black on any modern or farmhouse home
- Paint with exterior latex paint + primer in one (Sherwin-Williams “Emerald Exterior” or Benjamin Moore “Aura Exterior,” around $60–$80/gallon). Apply two coats minimum.
- Seal with a clear exterior topcoat (Minwax Helmsman Spar Urethane) for extra durability in wet climates.
Design tip: If your house has colored shutters, match the trellis to the shutters rather than the door. It ties the entire exterior together and makes the color feel intentional rather than random.
8. Cedar Pergola with Matching Planter Boxes at the Entry
This setup is perfect for homes where you can’t dig into the ground — concrete driveways, compacted clay, HOA-restricted properties. The trellis arch frames the entry, and large cedar planter boxes at the base of each post contain the climbing plants. Everything grows up and through the trellis from the planters.
Step-by-step:
- Build or buy a cedar arch. A simple 3-post pergola-style arch (two uprights + crossbeam top with lattice sides) works best here. Cedar arbor kits at Home Depot and Lowe’s run $150–$300, or have a carpenter build one for $400–$700.
- Build matching cedar planter boxes. Each box needs to be at least 18 inches deep and 24–36 inches long. Use cedar 1×6 boards ($12–$18 at Home Depot). A simple box can be built in about an hour with basic tools.
- Position planter boxes at the base of each upright post. Anchor post feet inside or beside the planter rather than into the ground.
- Fill with quality potting mix. Miracle-Gro Moisture Control Potting Mix performs well in outdoor planters.
- Plant for height and layered bloom. Put a climbing rose or clematis in the back of each planter (to grow up the post), a mid-height plant like lavender or salvia in the middle, and trailing sweet alyssum or creeping thyme at the front edge.
- Add drip irrigation. Planters dry out fast in summer heat. A Rain Bird drip timer from Lowe’s (around $35) makes it hands-off.
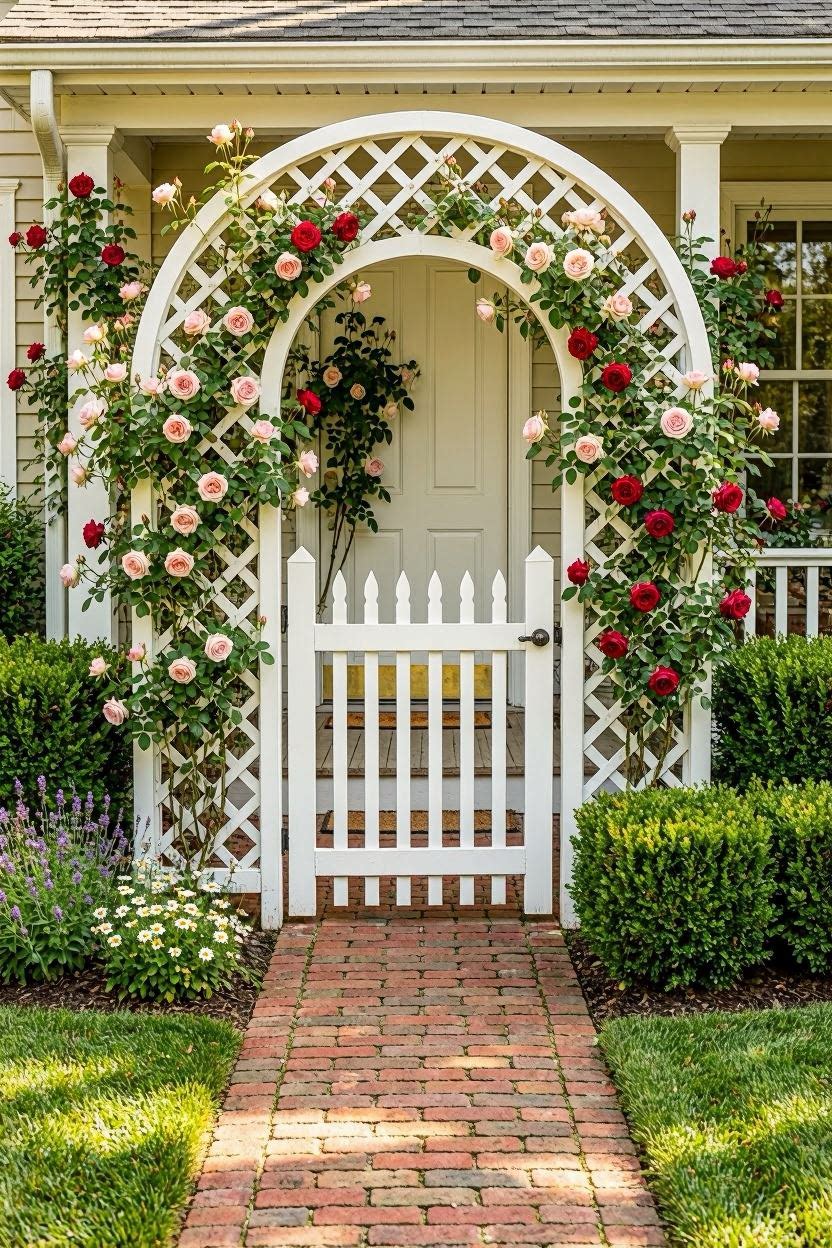
9. Grand White Colonial Trellis with Climbing Roses
For a classic American colonial home with symmetry, columns, and arched windows, this is the definitive trellis treatment. A wide, structured arch — almost architectural in scale — made from painted white wood or PVC, with lattice panels on both sides and white climbing roses growing up and over.
Step-by-step:
- The structure needs to be proportional to the house — at least 7–8 feet wide and 8–9 feet tall for a two-story colonial. This is a carpenter or contractor project, not a pre-made kit.
- Use cellular PVC trim boards (AZEK brand, available at Home Depot) instead of wood for the arch, columns, and frame. PVC won’t rot, needs painting just once, and stays white for decades.
- Use white vinyl lattice panels for the side sections (4×8 ft sheets at Lowe’s, about $25 each).
- For white climbing roses, plant ‘White Dawn’ or ‘Iceberg Climbing’ — both are vigorous, disease-resistant, and bloom repeatedly from June through frost.
- Add matching black coach lanterns on either side of the steps (Kichler and Progress Lighting offer great outdoor lanterns for $60–$150 each at Home Depot).
Budget: A full custom-built colonial trellis runs $1,200–$3,500 installed. A scaled-down version — just the arch over the door with two small lattice panels — can be built for $300–$600 and delivers most of the same visual impact.
10. Trellis with String Lights for Evening Curb Appeal
This idea takes your existing trellis from a daytime feature to something magical every evening. Warm string lights woven through a rose or vine-covered arch create a glowing entrance that costs almost nothing to add.
Step-by-step:
- Start with any arch or overhead trellis already planted up with roses, wisteria, or clematis.
- Choose weatherproof string lights rated IP65 or higher. Govee and ADDLON both make great outdoor string lights on Amazon for $25–$45 per 50-foot set.
- Use warm white bulbs at 2700K–3000K for the best evening glow. Cool white (5000K+) looks harsh and clinical outdoors.
- Weave the light string loosely through the branches and vines, starting at one post base and working your way up and over.
- Plug into a weatherproof outdoor outlet, or use a plug-in light timer ($12 on Amazon) so they come on automatically at dusk and shut off at midnight.
- For a neater look, run the cord along the back face of the trellis frame so only the bulbs show through the front.
Cost to add to an existing trellis: $25–$80. The biggest impact for the smallest investment on this list.
11. Reclaimed Wood Flat Trellis for a Rustic Farmhouse Look
This look embraces imperfection. Weathered wood planks, rough-cut vertical strips, and wild climbing plants that grow however they please. It suits old farmhouses, rural properties, and anyone who loves a worn-in, organic garden style.
Step-by-step:
- Source reclaimed wood from a local salvage yard, Habitat for Humanity ReStore, or a Craigslist listing. Old fence boards, barn siding, and railway sleepers all work.
- Build a flat trellis panel: cut vertical boards to 6–7 feet long, then nail a horizontal top rail and bottom rail to connect them (like a ladder with multiple rungs). Space boards 2–3 inches apart.
- Mount to the house exterior using screw-in wall anchors. Use cedar shims behind the panel to keep it slightly off the wall surface for air circulation.
- Plant self-clinging or light-weight vines: wild rambling rose, morning glory, climbing hydrangea, or native coral honeysuckle. These suit the informal look better than trained climbers.
- Don’t over-train. Let it grow naturally for the authentic rustic look.
- Treat the wood with linseed oil or beeswax wood finish to slow weathering without making it look polished.
Total cost: $20–$80 if you source reclaimed materials locally.
12. Espalier Tree as a Living Trellis on a Brick Wall

Espaliering is the technique of training a tree to grow flat against a wall in a deliberate, two-dimensional pattern. It looks like something between living sculpture and architecture. Perfect for brick homes, stone cottages, or anyone who wants something genuinely unique and uncommon in their neighborhood.
Step-by-step:
- Choose a tree that espaliers well. Best options: apple, pear, magnolia, camellia, or pyracantha (firethorn — stunning red berries in fall). Buy a young, flexible tree — 2–3 years old is ideal. Stark Brothers (starkbros.com) sells pre-started espalier apple trees for $50–$80.
- Install horizontal support wires before planting. Use galvanized wire (12-gauge) and screw eye hooks into the mortar joints (not the bricks themselves). Space wires 18 inches apart vertically, at heights of 18”, 36”, 54”, and 72” from the ground.
- Plant the tree 8–12 inches from the wall.
- Select 2–4 horizontal branches — one pair per wire level — and tie them gently outward along the wires. Remove all other branches at the trunk.
- Each year in late winter, continue tying newly grown horizontal branches to the next wire level. Prune everything else back to 2–3 buds.
- A full espalier takes 4–7 years to develop. But even a partially trained 2-year espalier looks impressive against a brick wall.
This is the most advanced idea on this list, but nothing else looks quite like it.
13. Four-Season Trellis: Evergreen + Seasonal Vine Combo
Most trellises look spectacular in summer and completely bare in winter. The fix is pairing an evergreen climbing plant with a seasonal bloomer on the same structure.
Step-by-step:
- Install any flat wall trellis or arch at your front entry.
- Plant a fast-growing evergreen climber as your base layer: English ivy (Hedera helix), climbing euonymus (Euonymus fortunei ‘Coloratus’), or Carolina jessamine (Gelsemium sempervirens) which has yellow flowers in early spring.
- In the same planting bed, add a seasonal vine that blooms in a different season: clematis for summer, Virginia creeper for blazing red fall color, or climbing hydrangea for late spring white blooms.
- Train the evergreen to cover the lower half of the trellis and the seasonal vine to cover the upper half — giving each plant its own zone.
- In winter, the evergreen base keeps the trellis looking full and alive even when the seasonal vine goes dormant.
Best combinations by USA zone:
| Zone | Evergreen Base | Seasonal Accent | What You Get |
|---|---|---|---|
| 4–6 | English ivy | Virginia creeper | Green summer + brilliant red fall |
| 6–8 | Climbing euonymus | Clematis ‘Jackmanii’ | Year-round green + purple summer flowers |
| 8–10 | Carolina jessamine | Bougainvillea | Yellow spring + magenta summer |
14. Full-Coverage Vine Trellis for Maximum Drama

This is the most dramatic look of all: vines that grow not just up a trellis but across a large section of the entire front facade. The wall itself becomes a living, seasonal tapestry. In fall, plants like Virginia creeper and Boston ivy turn crimson, orange, and gold in a way that stops people walking by.
Step-by-step:
- Install UV-resistant plastic mesh grid panels across the targeted wall section. Lee Valley Tools sells these for $15–$25 each, mounted with standoff clips 2 inches from the wall.
- Alternatively, use a stainless steel cable wire trellis system. Horizontal 3mm stainless cables strung every 12 inches between wall anchors with turnbuckles to keep tension looks clean and modern. Vine Grips (vinegrips.com) sells full kits for $80–$200.
- Plant Virginia creeper or Boston ivy at three or four evenly spaced points along the wall base. Both are self-clinging (they use adhesive pads) and extremely vigorous — expect 6–10 feet of growth per season once established.
- In the first season, guide stems toward the trellis wire or mesh. After that, they largely self-direct.
- Keep a 6-inch clear zone around all windows, gutters, and soffit vents — vines will grow into every gap if you let them.
Annual maintenance: Trim back from windows and roof edges each spring with loppers. Takes 30–60 minutes on a mature planting.
Quick Trellis Material Comparison Table
| Material | Lifespan | Best House Style | Maintenance Level | Avg. Cost |
|---|---|---|---|---|
| Painted white wood | 5–10 years | Cottage, colonial | Paint every 2–3 yrs | Low |
| Cedar (natural finish) | 15–20 years | Craftsman, farmhouse | Oil every 3–5 yrs | Medium |
| Powder-coated steel | 20–30 years | Modern, contemporary | Touch up rust spots | Medium-High |
| Vinyl / PVC | 25–40 years | Colonial, traditional | Hose down annually | Very Low |
| Bamboo | 3–6 years | Tropical, natural | Replace sections | Very Low |
| Reclaimed wood | 5–15 years | Rustic, farmhouse | Linseed oil occasional | Very Low |
FAQ
How deep do trellis posts need to go into the ground? For free-standing arches and pergolas, bury posts at least one-third of their total length. An 8-foot post needs 2.5 feet underground, set in concrete (Quikrete fast-set, $6/bag).
Can I attach a trellis directly to my house siding? Yes, but always use standoff brackets that keep the trellis 2–3 inches away from the wall. Direct contact traps moisture and can rot both the trellis and your siding over time.
What’s the fastest-growing trellis plant in the USA? Virginia creeper and trumpet vine (Campsis radicans) are the fastest — up to 10 feet per season. For flowers, climbing roses are the most popular and grow 3–6 feet per year once established.
Do I need a building permit for a trellis? Most US counties don’t require a permit for a freestanding trellis or arbor under 200 square feet. If you’re anchoring a structure to the house itself or building something over 10 feet tall, check with your local building department first.
When is the best time to install a trellis and plant climbers? Install the structure any time of year. Plant climbers in early spring (March–April) or fall (September–October) when temperatures are mild and roots can establish before the heat or cold stress begins.
Final Thoughts
A trellis for the front of your house doesn’t need to be a big, complicated project. Even a simple $80 arch with two climbing roses changes how your home reads from the street — in a single growing season.
Start with your house style, pick a material that suits your climate and maintenance tolerance, and choose one plant you’ll enjoy caring for. Whether it’s the romantic white rose arch of a New England cottage, the dramatic black steel grid of a modern home, or a simple bamboo frame on a stucco wall — the right trellis makes your home genuinely memorable.
Pick one idea from this guide that fits your house this weekend. Get the structure up, plant in the next watering window, and watch what happens by summer.