12 Raspberry Trellis Ideas That Actually Work (DIY + Budget-Friendly)
Why Your Raspberries Need a Trellis
Let’s be honest — a raspberry cane left to itself turns into a tangled mess by August. A trellis keeps canes upright, gets more sun to the berries, and makes picking so much easier. It also helps air move through the plants, which means less disease.
Whether you have 5 plants or 50, there’s a trellis style that fits your space and budget. Here’s everything you need to know, step by step.
1. Understand Your Raspberry Type First
Before you build anything, know what kind of raspberries you’re growing. This changes the trellis height and wire setup you’ll need.
| Raspberry Type | Examples | Cane Height | Best Trellis Style |
|---|---|---|---|
| Summer-bearing | Meeker, Willamette | 5–6 ft | Two-wire T-post |
| Ever-bearing | Heritage, Caroline | 4–5 ft | Single-wire or V-trellis |
| Black raspberry | Jewel, Bristol | 4–5 ft | Low single-wire |
Most backyard growers have summer-bearing varieties — the classic two-wire T-post trellis works best for those.
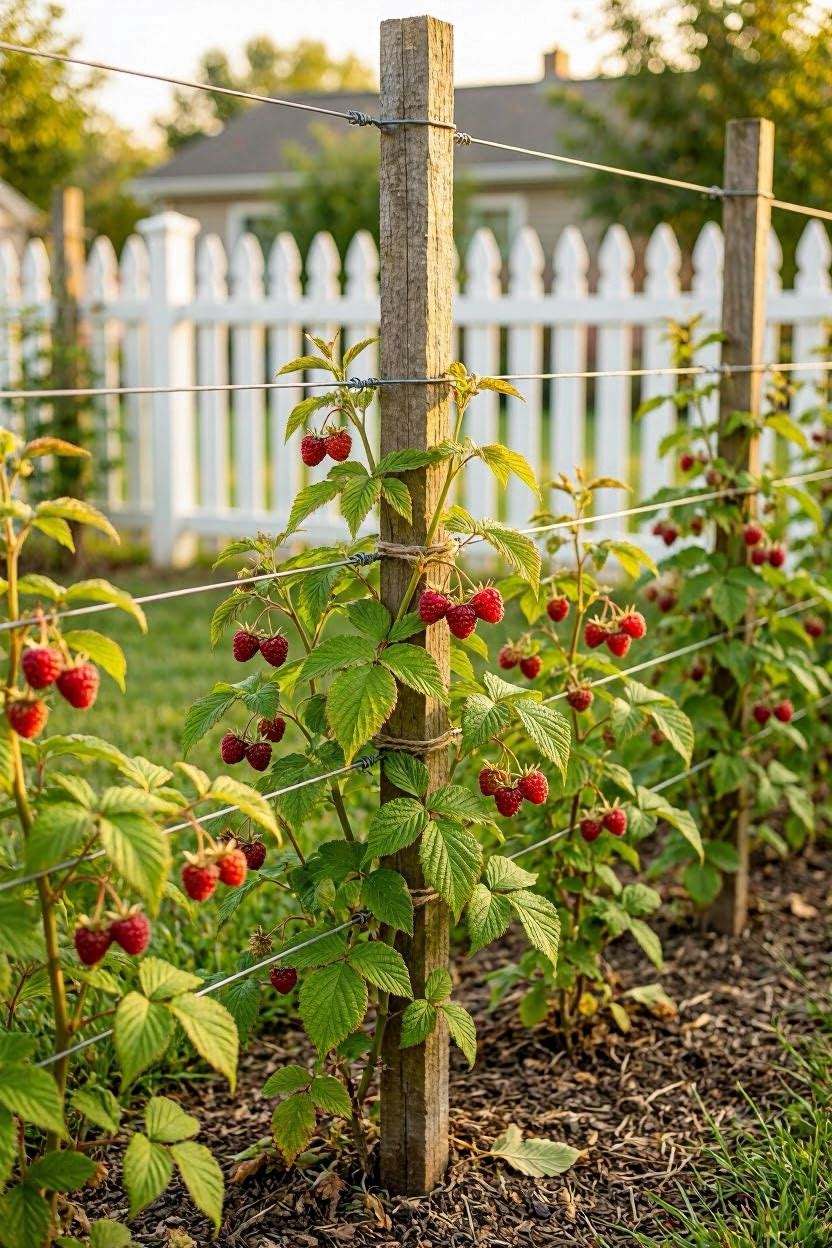
2. The Classic T-Post Trellis (Most Popular)
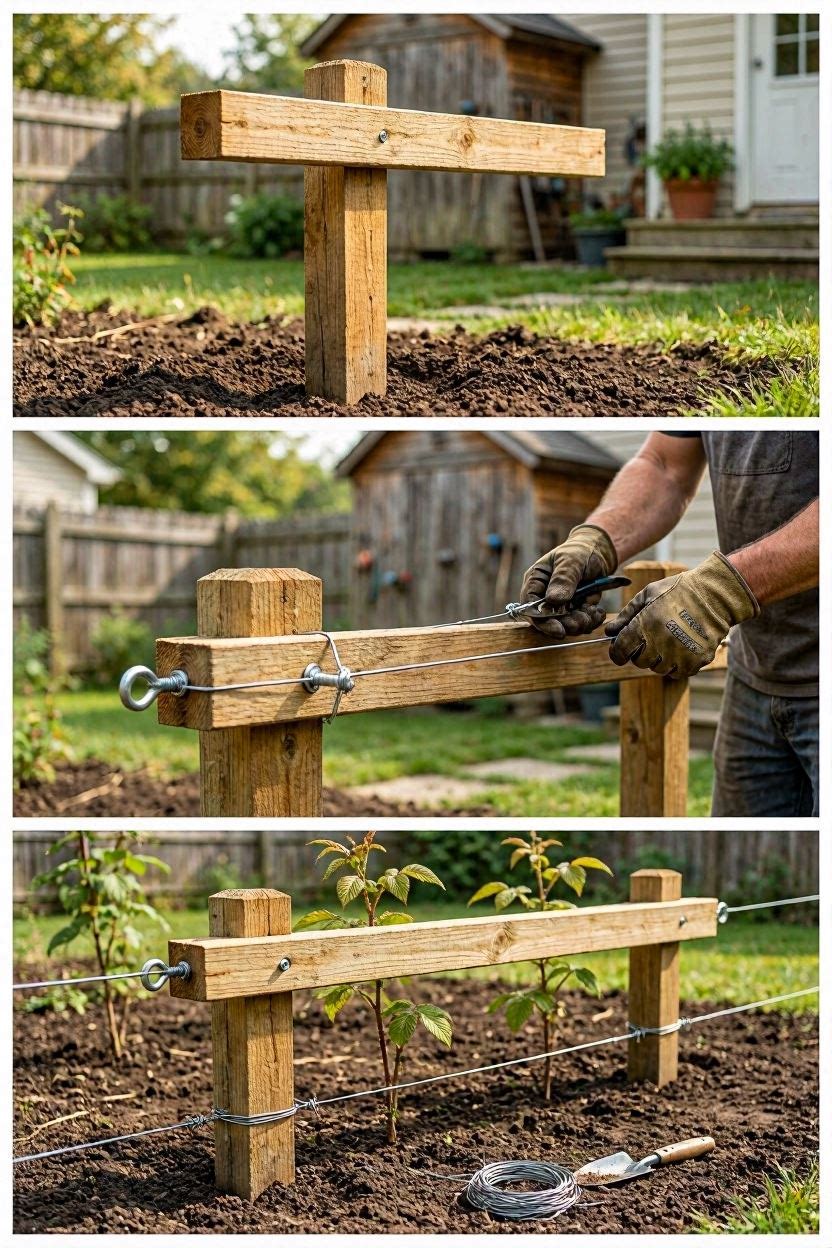
This is the workhorse of raspberry trellises. Simple, strong, and easy to build in an afternoon.
What You Need
- Wooden posts — 4×4 cedar or pressure-treated, 7 ft long (cut 2 ft into ground = 5 ft above)
- Crossarms — 2×4 boards, 2 ft wide, one at top and one at mid-height
- Galvanized wire — 12 or 14 gauge (find it at Home Depot or Tractor Supply, ~$15–$25 for 100 ft)
- Wire staples or eye bolts — to attach wire to crossarms
- Post hole digger or rented auger — for setting posts
How to Build It (Step by Step)
Step 1 — Space your posts. Set posts every 15–20 feet along your row. For a beginner row of 10–15 plants, 2–3 posts is plenty.
Step 2 — Dig 2-foot-deep holes. Use a manual post hole digger (~$30 at Home Depot) or rent a power auger for $50–$80/day from Home Depot Tool Rental.
Step 3 — Attach crossarms. Screw a 2-foot 2×4 crossarm near the top and one about halfway down each post. Use 3-inch exterior screws.
Step 4 — String your wire. Run one wire along the outer edge of each crossarm — so you end up with two wires on each level, creating a “channel” for canes. Staple wire tight at each post.
Step 5 — Tie your canes. Gently tie new canes upright between the wires using soft garden twine or velcro plant ties.
Total cost: $40–$80 for a 20-foot row. Posts at ~$8–$12 each, wire $15–$25.
3. The Single-Wire Fence Trellis (Beginner-Friendly)
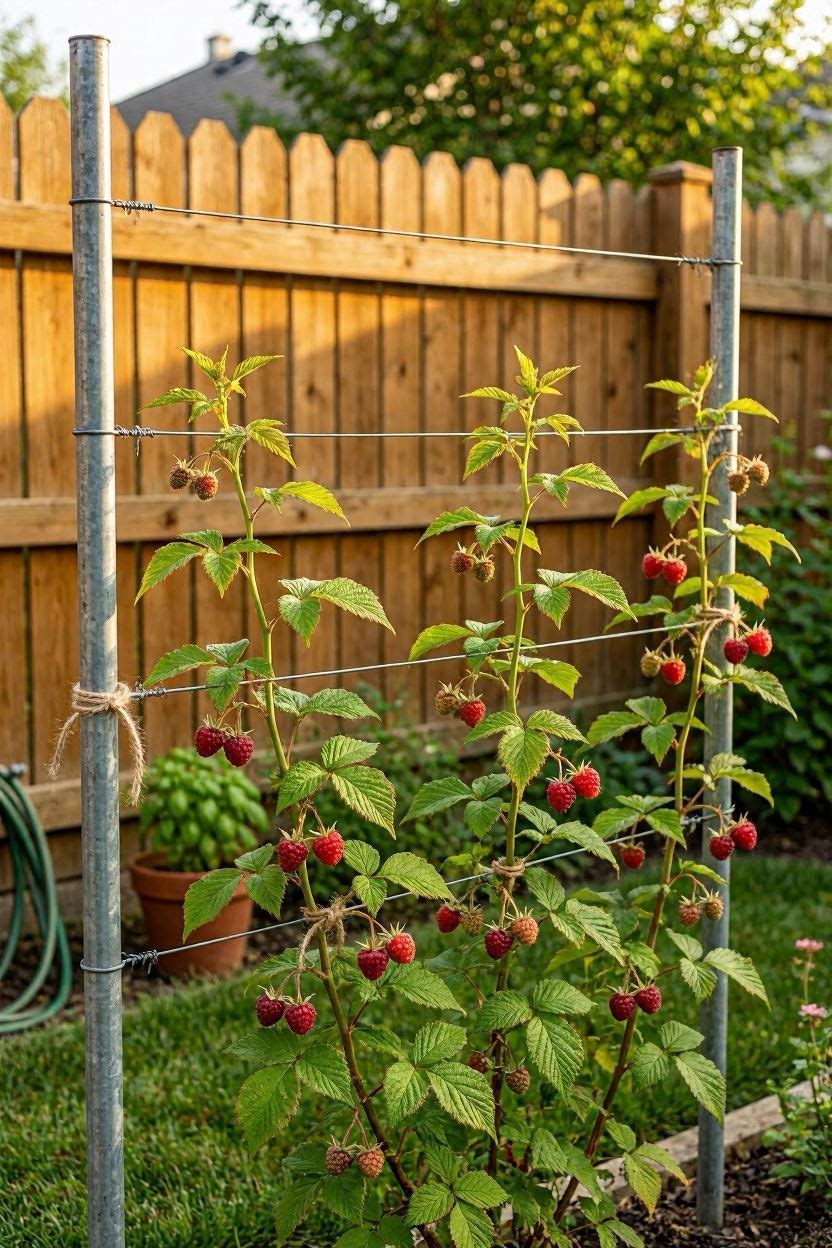
If you only have one short row or you’re just starting out, a single-wire trellis is all you need.
How to Build It
- Set two end posts (metal T-posts work fine — about $5–$8 each at Tractor Supply)
- Stretch one or two wires between them at 3 ft and 5 ft height
- Tie canes to the wire loosely as they grow
Best for: Small gardens, ever-bearing varieties, first-year growers
Cost: $15–$30 total
Tip: Metal T-posts are faster to install than wood — just drive them in with a post driver ($25–$35). No digging needed.
4. The V-Trellis (Best for Heavy Crops)
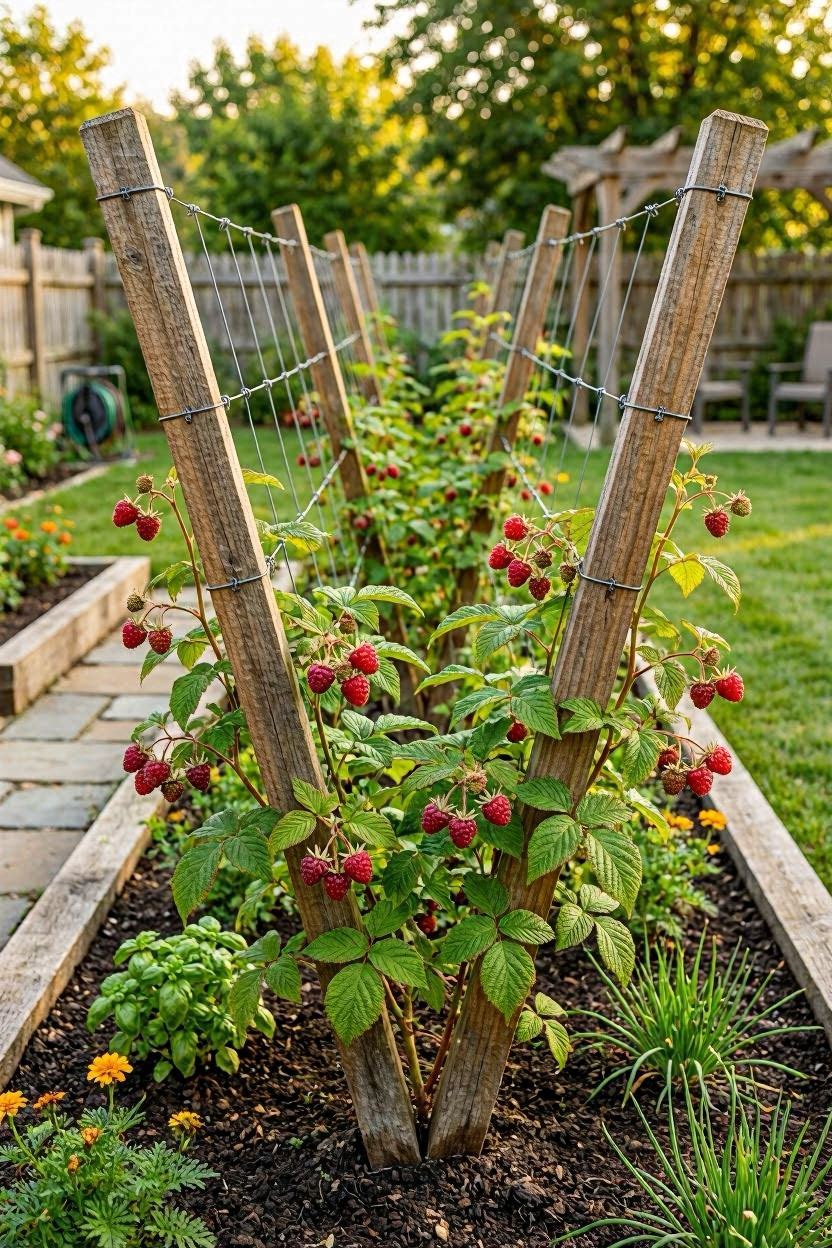
The V-trellis splits your canes into two angled walls — fruiting canes lean to one side, new growth canes lean to the other. You get better airflow, easier picking, and bigger yields.
How It Works
- Post leans outward at 20–30 degrees on each side of the row
- Two sets of wires run along each angled arm
- Old canes go on one side; new canes grow up the center and shift over after harvest
Building It
- Use 8-ft posts and set at an angle in the ground
- Connect posts at the base with a center anchor
- String 2 wires on each side at 3 ft and 5 ft heights
Cost: $60–$100 for a 20-foot row. Slightly more complex but worth it for high-production rows.
5. Wood Post + Cedar Rail Trellis (Looks Beautiful)
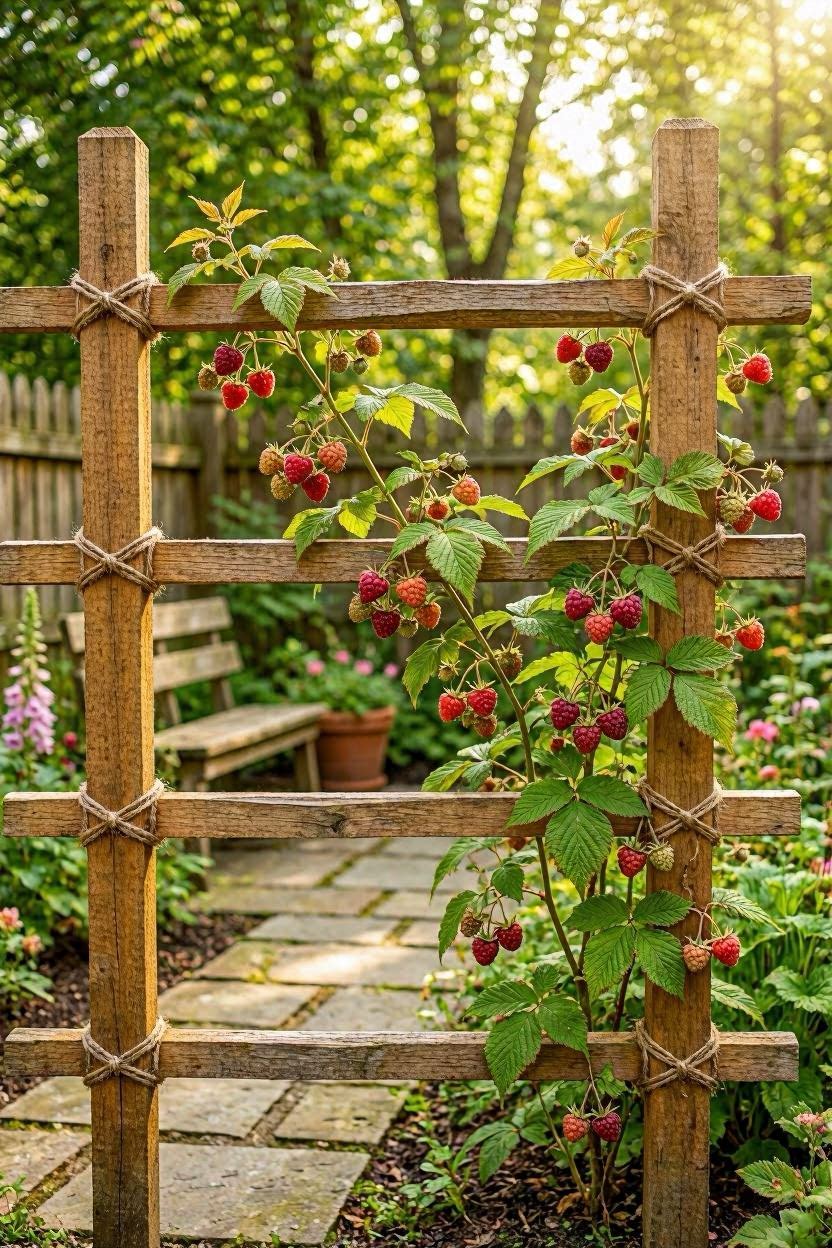
If your garden is visible from the yard or patio, you might want something that looks good, not just functional. Cedar rail trellises do both.
Materials
- Cedar split rails (find at Lowe’s or rural fencing suppliers, ~$10–$15 each)
- 4×4 cedar posts as uprights
- Optional: stain with an exterior wood stain to match your fence
Design Options
| Style | Description | Cost Estimate |
|---|---|---|
| Two-rail horizontal | Rails run parallel, canes tied between | $50–$80 |
| Ladder style | Vertical slats between rails | $80–$120 |
| Arch top | Curved top rail for decorative look | $100–$150 |
Cedar is naturally rot-resistant — no need for pressure treatment. It’ll last 10–15 years outdoors.
6. Metal Cattle Panel Trellis (Incredibly Strong)
Cattle panels are large welded wire grids — usually 16 ft long, 4–5 ft tall — originally made for livestock fencing. Gardeners figured out they’re perfect for raspberries too.
Why Gardeners Love Them
- Super sturdy — won’t sag under heavy canes
- No wire to string — the grid is already built in
- Canes weave right through the grid
Where to Buy
- Tractor Supply Co. — ~$25–$35 per 16-ft panel
- Rural King or local farm supply stores
- Online via Amazon (~$40–$55 with shipping)
Just set two posts and wire the panel to them. Done in 20 minutes.
Best for: Large rows, anyone who wants zero maintenance on the trellis itself.
7. Bamboo Stake Trellis (Budget Option Under $20)
For a small patch — say 5 to 8 plants — bamboo stakes and garden twine are all you need.
How to Do It
- Push a 6-ft bamboo stake next to each plant
- Run garden twine horizontally between stakes at 3 ft and 5 ft height
- Loop twine around each stake and tie off
Total cost: $10–$20 — bamboo stakes are $5–$8 for a pack of 25 at Home Depot or Amazon.
This isn’t a forever solution, but it works well for the first year or two while you figure out your layout.
8. Choosing the Right Wire (Quick Reference)
| Wire Type | Gauge | Best For | Cost (100 ft) |
|---|---|---|---|
| Galvanized smooth wire | 12-gauge | Heavy-bearing rows, long spans | $18–$25 |
| Galvanized smooth wire | 14-gauge | Short rows, lighter canes | $12–$18 |
| High-tensile wire | 12.5-gauge | Large farms, commercial rows | $20–$30 |
| Polywire/electric | Various | Deer deterrent combo | $15–$25 |
Always use galvanized wire outdoors — regular steel rusts within 1–2 seasons.
9. How Far Apart to Space Posts
This is one of the most common questions. Here’s a simple guide:
- 15 feet apart — standard for most backyard rows
- 20 feet apart — fine if you use heavier wire (12-gauge) and add a center brace wire
- Never more than 25 feet — wire will sag too much under cane weight
End posts take the most strain. Angle them slightly outward (about 10–15 degrees) and pack the soil firmly, or add a diagonal brace post at each end.
10. Tying Canes the Right Way
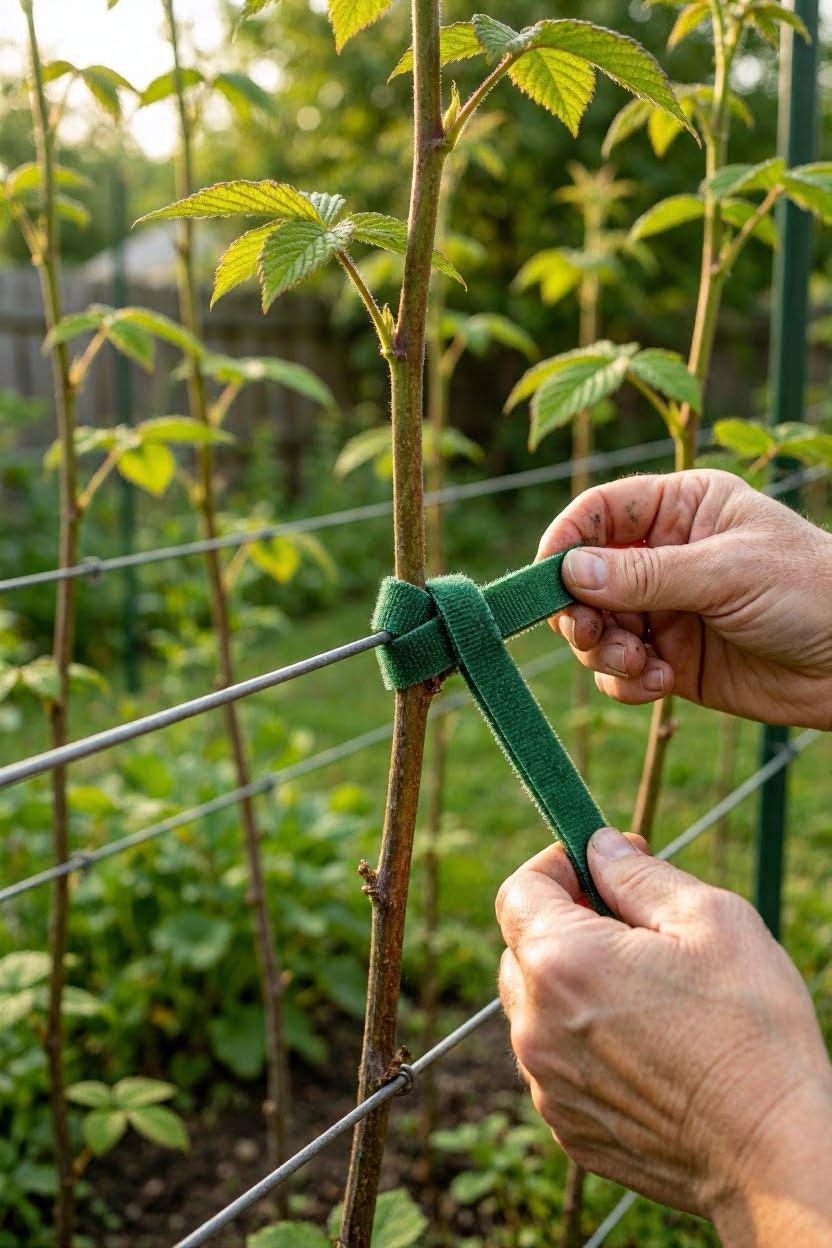
Even the best trellis fails if you tie canes too tight or too loose. Here’s the right way:
- Use soft materials: Garden twine, stretchy velcro plant ties, or torn fabric strips
- Never use wire directly on canes — it cuts into the bark
- Tie in a figure-8 loop — cane goes through one loop, wire goes through the other, so they don’t rub
- Space canes 4–6 inches apart along the wire for good airflow
- Tie in spring when canes are still flexible, not mid-summer when they’re stiff
Velcro plant ties (like Miracle-Gro or Grower’s Edge brand) from Amazon or garden centers run about $6–$10 for a roll and are reusable for years.
11. What to Do With New Canes vs. Old Canes
This trips up a lot of new raspberry growers. Here’s the simple version:
Floricanes (old canes, 2nd year): These are the ones that fruit. Tie them to the trellis in spring and remove them completely after harvest.
Primocanes (new canes, 1st year): These grow up during the fruiting season. Keep them loosely gathered in the center or on a separate wire — they become next year’s fruiting canes.
A V-trellis (Section 4) handles this separation automatically. With a standard T-post trellis, use the outer wires for old canes and tie new canes loosely to a center wire or post.
12. Quick Maintenance Tips to Make Any Trellis Last
- Check wire tension each spring — cold winters loosen everything
- Re-drive any leaning posts before canes get heavy in early summer
- Oil or treat wood posts at ground level every 2–3 years
- Remove and compost old canes immediately after fruiting — don’t leave them on the trellis all winter
- Inspect for rust on wire connections each spring and replace any corroded sections
Frequently Asked Questions
How tall should a raspberry trellis be?
Most raspberry canes grow 4–6 feet tall. Build your trellis to 5–6 feet above ground so the tallest canes can be tied upright without bending.
Can I use T-posts instead of wood posts?
Yes — metal T-posts ($5–$8 at Tractor Supply) are faster to install and don’t rot. Attach crossarms to them using U-bolts or clip-on post attachments made for T-posts.
How many plants per trellis post?
Plan for about 5–8 plants between each pair of posts (so every 15–20 feet of row).
Do raspberries need a trellis to survive?
No, but yields drop significantly and disease pressure increases without one. Even a simple single-wire setup makes a noticeable difference.
What kind of posts last longest?
Black locust wood is naturally rot-resistant and can last 20–30 years in the ground. Cedar is a close second at 10–15 years. Pressure-treated pine (rated for ground contact) is the most affordable option at 15–20 years.
Final Thoughts
You don’t need a perfect trellis to grow great raspberries — you just need one that holds your canes upright and keeps things tidy. Start simple: a few T-posts and two wires. As your patch grows, you can upgrade.
If you’re only growing 5–10 plants, bamboo stakes and twine will honestly get you through the first year for under $20. If you’re serious about a long-term berry garden, spend a weekend building a proper T-post or cedar rail setup and it’ll last a decade with minimal upkeep.
The best trellis is the one you actually build — so pick one from this list and get started before your canes flop over.